Whiteboard markers can appear interchangeable, but the wrong pen can produce faint writing, lines that are difficult to read or ink that does not erase cleanly from the selected surface. Tip shape, ink type, colour, board material and viewing distance all influence how well a marker performs.
The right whiteboard marker is compatible with the writing surface, produces an appropriate line width and can be removed using the cleaning method intended for that board. Bullet-tip dry-erase markers suit many everyday applications, chisel tips provide greater line variation, and fine tips are useful for planners and detailed diagrams. Glassboards may require markers with stronger contrast or products specifically identified as suitable for glass.
Before ordering whiteboard markers, identify the boards they will be used on, who will use them and how frequently the information will change.
1. Match the Marker to the Writing Surface
Surface compatibility should be the first buying consideration. A marker that works well on a conventional whiteboard may not provide the same visibility or erasability on glass, a printed planner or another non-porous surface.
Common writing surfaces include:
• Standard commercial whiteboards
• Porcelain whiteboards
• Glass whiteboards
• Printed planners and scheduling boards
• Mobile presentation boards
• Combination boards
• Laminated non-porous surfaces
Check the product specification for both the board and the marker. Terms such as “whiteboard marker”, “dry-erase marker” and “glassboard marker” can describe products with different ink characteristics.
Magnetic functionality does not determine which marker should be used. A magnetic board may accept magnets, but marker compatibility still depends on the writing surface.
Do not assume a whiteboard marker is suitable for a chalkboard or porous display surface. Using the wrong pen can leave staining or require cleaning methods that damage the board.
2. Choose Between Dry-Erase and Wet-Erase Ink
Dry-erase and wet-erase markers are designed for different update cycles.
Dry-Erase Markers
Dry-erase markers are intended for information that changes frequently. Writing can normally be removed with a suitable dry eraser, making these markers practical for:
• Meetings and presentations
• Classroom teaching
• Daily task boards
• Brainstorming sessions
• Frequently updated planners
• Training rooms
• Shared workplace whiteboards
They are usually the most convenient choice when several people need to write, erase and update information throughout the day.
Wet-Erase Markers
Wet-erase markers are removed with a damp cloth rather than an ordinary dry eraser. They can be useful when information needs to remain visible but still be changed periodically.
Potential applications include:
• Monthly schedules
• Semi-permanent headings
• Rosters
• Menu information
• Calendar grids
• Labels and reference sections
• Planning boards vulnerable to accidental smudging
Wet-erase ink should not be treated as permanent, but it may resist casual contact better than conventional dry-erase writing. Surface compatibility must still be checked before use.
The detailed comparison of wet-erase markers and dry-erase markers explains how their removal methods and applications differ.
3. Select the Right Marker Tip
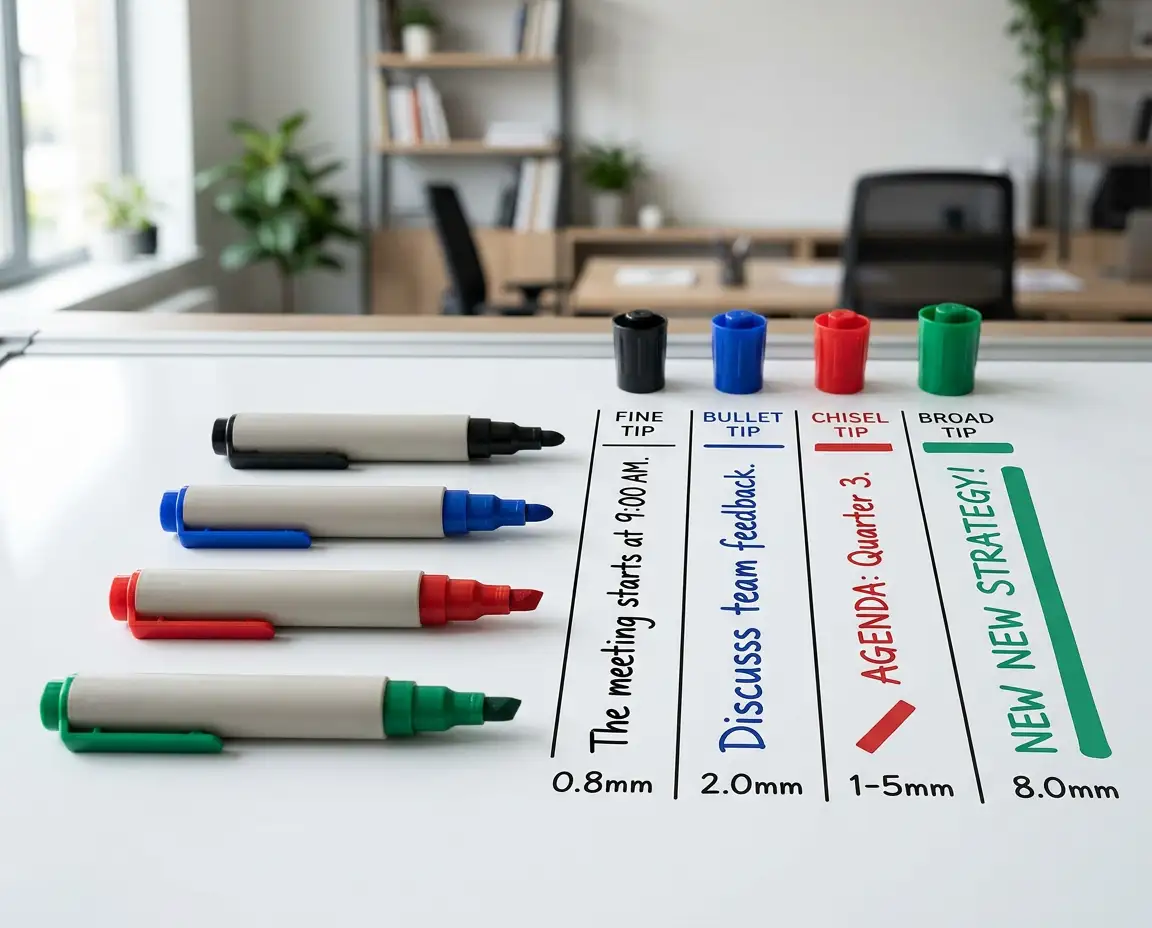
Tip shape determines line width, writing style and how easily the marker can be read from a distance.

Bullet Tips
A bullet tip produces a relatively consistent line and is a practical general-purpose option. It works well for ordinary handwriting, lists, diagrams and classroom notes.
Bullet-tip markers can suit:
• Meeting rooms
• Classrooms
• Staff notice areas
• Small and medium whiteboards
• General office use
• Shared marker sets
They are often the simplest choice when a marker will be used for several different tasks.
Chisel Tips
A chisel tip can produce broader or narrower lines depending on how the marker is held. It is useful for headings, emphasis and presentation writing.
Chisel-tip markers may be appropriate for:
• Large boards
• Training rooms
• Presentation spaces
• Headings and section labels
• Diagrams requiring different line weights
• Writing viewed from further away
Users unfamiliar with chisel tips may need some practice to produce consistent lettering, but the added line variation can improve the visual hierarchy of a board.
Fine Tips
Fine-tip whiteboard markers are designed for detailed writing. They can be useful where the available writing area is divided into small sections.
Common applications include:
• Weekly and monthly planners
• Small whiteboards
• Detailed diagrams
• Technical notes
• Calendar entries
• Tables and grids
• Individual desk boards
Fine writing is harder to read from a distance, so fine-tip markers should not be the default for large meeting-room or classroom boards.
Broad Tips
Broader marker tips can improve visibility on large boards. They are most useful for headings, presentations and information intended to be read across a room.
A broad marker may be unsuitable for detailed planners or compact writing areas. Match the tip to both the board size and normal viewing distance.
4. Choose Colours That Improve Readability
Marker colours should make information easier to understand. A board covered with too many colours can become harder to interpret than one using a simple, consistent system.
Black and blue are commonly suitable for general writing because they usually provide strong contrast on light-coloured boards. Other colours can be assigned to specific purposes, such as:
• Red for urgent items or exceptions
• Green for completed tasks or approvals
• Blue for general information
• Black for headings and primary content
• Additional colours for departments, teams or project stages
The colour system should be documented and used consistently. Do not rely on colour alone to communicate critical information. Labels, symbols or written status descriptions can help users interpret the board correctly.
Dark or coloured glassboards require particular attention. Standard dark ink may have insufficient contrast on black or deeply coloured surfaces. Buyers comparing glass whiteboards should confirm which marker colours and ink types are recommended for the selected board.
Test the marker from the normal viewing position rather than only at arm’s length. Ink that appears clear while writing may be difficult for people at the opposite end of a meeting room or classroom to read.
5. Match Markers to the Application
The same marker set will not suit every environment. Consider how the board is used before selecting tip sizes, colours and pack quantities.
Offices and Meeting Rooms
Office whiteboards usually need versatile markers that support notes, diagrams and presentations. Bullet and chisel tips are practical choices, with black, blue, red and green covering many common requirements.
Provide a complete marker set at each frequently used board. Relying on staff to bring markers from another room often results in incomplete sets, missing colours or meetings delayed by dried-out pens.
Classrooms and Training Rooms
Classroom markers need to produce clear writing that can be read from the back of the room. Medium or broader tips are generally more practical than fine tips for whole-class instruction.
A controlled colour system can help separate headings, worked examples, corrections and key concepts. Too many colours may distract from the lesson or reduce consistency between teachers.
Check product labelling and any relevant age or supervision guidance when markers will be used directly by students.
Planners and Scheduling Boards
Weekly planners, monthly calendars and printed workflow boards often contain small writing areas. Fine or medium tips provide greater control, particularly where each date or task has a limited amount of space.
Avoid using excessively broad markers on printed boards because the writing can obscure grid lines, headings and adjacent entries.
Glassboards
Glassboards can require higher-contrast ink than conventional whiteboards. The most suitable marker depends on the colour and construction of the glass surface.
Confirm:
• Marker compatibility with glass
• Visibility on the selected board colour
• Recommended cleaning method
• Whether the ink is dry-erase or wet-erase
• Whether specialist opaque or fluorescent colours are required
Testing a sample marker on the board can prevent a large order of pens that are technically erasable but difficult to see.
Operational and Production Boards
Task boards, safety boards and production schedules may be updated by multiple users across several shifts. Marker selection should prioritise readability, consistent colour coding and easy replacement.
Keep the system simple enough that new employees and temporary staff can understand it without extensive explanation.
6. Calculate How Many Markers to Buy
Marker quantity should reflect the number of active boards, the number of users and how frequently markers are replaced.
Start by recording:
• Number of whiteboards in use
• Number of rooms containing boards
• Required colours per board
• Number of people writing at the same time
• Frequency of use
• Need for spare markers
• Storage and replacement arrangements
A small meeting room may only require one complete set and one spare black marker. A training room may need several markers in the same colour so multiple presenters or participants can write at once.
For schools, shared offices and training facilities, distributing markers across dedicated room sets can be easier to manage than keeping one large central supply.
Bulk purchasing may be practical where the same marker is used throughout a site. Before committing to a large quantity, test the selected marker on the organisation’s actual boards and confirm that users are comfortable with the tip and barrel design.
Monitor replacement frequency. If one colour consistently runs out before the others, future orders can be adjusted rather than repeatedly purchasing equal assorted packs.
7. Plan Marker Storage and Accessories
Markers are easier to manage when every board has a defined storage location. Pens left on desks, window ledges or meeting tables are more likely to be misplaced or left uncapped.
Useful storage and board accessories can include:
• Pen trays
• Magnetic marker holders
• Wall-mounted storage cups
• Erasers
• Compatible cleaning products
• Replacement magnets
• Adhesive lining tape
• Spare marker sets
A magnetic pen tray can keep markers close to a compatible magnetic board without requiring permanent mounting.
When documents, plans or printed schedules will also be displayed, review the available whiteboard magnets. Glassboards may require stronger magnets than conventional magnetic whiteboards, so confirm compatibility with the selected surface.
Assign responsibility for checking each marker set. A simple weekly check can identify missing markers, damaged tips and empty pens before the board is needed for a meeting or lesson.
8. Protect the Board and Extend Marker Life
Good marker performance depends on both the pen and the condition of the board.
Practical maintenance steps include:
• Replace caps immediately after use
• Follow the manufacturer’s storage instructions
• Keep marker tips free from dust and residue
• Use cleaning products intended for the selected surface
• Avoid abrasive pads and unsuitable chemicals
• Clean heavily used boards before residue builds up
• Replace markers with damaged or frayed tips
• Remove old writing before it becomes difficult to erase
If a marker produces faint or inconsistent lines, check that the cap has been secured and that the pen has been stored as directed. If performance does not improve, replace it rather than pressing heavily against the board, which may damage the tip.
Permanent markers should be stored separately from whiteboard pens, particularly in shared classrooms and meeting rooms. Similar barrel designs can make them easy to confuse.
Accidents can still occur. The guide to removing permanent marker from a whiteboard outlines practical steps, but any cleaning method should first be checked against the board manufacturer’s care instructions.
9. Avoid Common Whiteboard Marker Buying Mistakes
Several avoidable mistakes can lead to poor writing quality, unnecessary replacement costs or damage to the board.
Buying Without Checking the Surface
Do not assume every erasable marker works equally well on standard whiteboards, porcelain boards, glassboards and printed planners.
Selecting Tips That Are Too Fine
Fine tips can look neat up close but become difficult to read across a classroom or meeting room.
Selecting Tips That Are Too Broad
Broad tips can overwhelm calendar cells, detailed diagrams and compact planning boards.
Choosing Too Many Colours
A large colour range is only useful when each colour has a defined purpose. An inconsistent system creates visual clutter.
Buying in Bulk Before Testing
Test marker visibility, erasability and user comfort on the actual board before placing a large site-wide order.
Forgetting Replacement Stock
A marker set is not useful when its most frequently used colour is empty. Keep a practical reserve based on actual consumption.
Mixing Permanent and Whiteboard Markers
Store permanent markers in a separate location and clearly identify the pens intended for the board.
Ignoring Accessories
Markers, erasers, trays and cleaning products should be planned together. A good marker system can still fail if pens are constantly lost or the wrong cleaning product is used.
10. Use a Final Whiteboard Marker Checklist
Before ordering, confirm:
• The writing surface
• Dry-erase or wet-erase requirements
• Compatibility with glass, porcelain or printed boards
• Required tip shape
• Appropriate line width
• Normal viewing distance
• Core marker colours
• Colour-coding rules
• Number of active boards
• Number of simultaneous users
• Required spare stock
• Pen tray or holder requirements
• Eraser and cleaner compatibility
• Storage instructions
• Responsibility for checking and replacing markers
Where several board types are used across one site, a single marker may not suit every surface. Create separate labelled sets where necessary and test each combination before standardising purchasing.

Conclusion
The right whiteboard marker depends on the board surface, writing detail, viewing distance and frequency of updates. Bullet tips suit general writing, chisel tips support headings and presentations, and fine tips provide control on planners and detailed diagrams. Dry-erase markers are practical for frequent changes, while wet-erase ink can suit information that needs greater resistance to accidental removal.
Choose colours for clarity rather than decoration, confirm compatibility with glassboards and provide each board with suitable storage, erasers and replacement stock. Testing markers on the actual writing surface before purchasing in quantity can prevent visibility and cleaning problems later.
For exclusive educator discounts, visit our Education Hub!